|
December 16, 2021 by Julia Weaver
Crafting a home that brings you joy and uplifts your spirits is something many homeowners crave. If your home interior doesn’t reflect your personality or your style, it can leave you feeling uninspired. So, the ultimate question is: Do you feel connected with your space? Incorporating one-of-a-kind decor into your home offers the personality, style, and texture that your space might be missing. Unique items that resonate with you can uplift your interior, whether it’s homemade or handcrafted by an artisan. We asked some of our favorite creators – from Vancouver, BC to Jacksonville, FL, to share their best ideas on how to enhance your space with one-of-a-kind decor. Look for adaptable pieces When purchasing handmade items, focus on work that can be moved around in the home, not just settling on the style of an individual room. – Jumping Creek Pottery Find art that brings its own personality to the space I think art placed in a home often adds the most when it is appropriate for the setting, yet also adds some element of intrigue, distinctiveness, or surprise. When artwork is overly color or theme-coordinated it will soon seem unremarkable or unimaginative. This does not mean that art in a home must be bold or shouldn’t be pretty or subtle, just that it will be strongest when it has its own personality that harmonizes with and stands up to the room in which it is placed. – Tania Dibbs Collaborate with a favorite artist of yours Reach out to an artist you’d love to collaborate on a custom collection that creates the look and feel you want for your home. Ask about works on paper, drawings, and prints as well as paintings. Consult your interior designer to incorporate pieces you already own, large feature works, and smaller pieces hung together gallery-style. – Fiona Valentine Find pieces that have a purpose I decorate with ceramics by using them to hold kitchen utensils, makeup brushes, or as a one-of-a-kind flower pot. If you’re interested in a display, stack 2-3 coffee table books on a coffee table or bookshelf & place your special item on top. This gives it pride of place and ensures people will ask about it when you have guests. – Imani at Home Choose ceramics that tell a story Something made by hand is so special that it inherently adds soul and dimension within a space. The Urban Kiln believes that handmade ceramic home decor pieces have a story to tell and the beauty that lies in the imperfection of handmade pottery that is in your home, makes your home “you”. – The Urban Kiln Consider the room you’re decorating When choosing a new piece of handmade art, you can narrow down your options by considering the specific use of the room you’re decorating. A still life of a fruit basket, for example, is going to look more at home in the kitchen than in a bathroom. A vibrant graffiti-style cityscape might be too overwhelming for a bedroom, but it would bring a great energy to a living room or office. – VanDuinen Studio, LLC Try displaying pieces in groups of three Ceramics can add unique handmade home appeal. Choosing handmade ceramic pieces for your home brings in part of the earth, with a sense of grounding and home. Many people think of functional mugs, plates, and bowls. Ceramics can add variety from small textured teaspoon holders for your coffee and tea drinkers, to plates mounted vertically as wall decor. Vases can be for tables, hanging plants or wall accents. I like to pair pieces in groups of three. When pairing I choose three things the same size but different colors, or you could use the same colors but different sizes. Handmade ceramics can be functional and versatile but are also durable and an investment that can last generations. – Stoney Tree Studio Bring home a part of Earth Decorating with handmade pottery, especially wood fire pottery, can deepen our connection to the Earth – Clay. Water. Stone. Trees. The process uses the most basic elements from which we, and everything around us, come from. The pot’s paint is a captivating picture of how those elements were transformed by fire. – Sherman Ceramics Showcase your unique style That bookcase behind you in Zoom meetings, Facetime, and Alexa exhibit a visual representation of you. Wouldn’t you love it to be as unique as you? When searching for items to decorate your bookshelf, buy handmade or small original artwork. Small meaning, 4×6″, 6×6″, 8×8″ to 8×10″ paintings – these sizes fit wonderfully in a bookshelf and are economical. Look for artwork that will add a pop of color next to neutral-colored books and plants. Leave spaces between items on your bookshelf to allow the eye to rest in the whitespace before it takes in the next visual representation of you. – Stephanie Weaver Your one-of-a-kind decor should reflect your style and interests Knitted goods have long been associated with being old-fashioned or retro in the same way that knitting itself is associated with old women. However, in recent years there has been a resurgence of fiber artists and designers that defy generation, gender, and style. Do not let old stereotypes deter you from knit decor or even trying your hand at the craft. – Modern Made Buy a handmade mug from a maker you love There is great satisfaction that comes from drinking your morning coffee out of a mug that you bought directly from it’s maker. – Sarah Bak Pottery Find an artist that creates with a purpose When I design my ceramic pieces, I am anticipating them living in somebody’s home. I set out with one of two objectives in mind; 1- The utilitarian piece will be a collaborative object, showcasing what accompanies it. (ex. food and drink on tableware, flowers in a vessel) I don’t want the piece to compete visually with food/flowers, but to work in harmony together. 2- The piece is a stand-alone, eye-catching object for decoration, a conversation piece. My sculptural objects fall under this category through form, surface, and color. – Stephanie Galli Ceramics Consider the message you want to share When you’re choosing artwork for your space, you’ll want to consider what messages you want to share, how the artwork will fit into your overall aesthetic and color scheme, and who the artist is. The best choice for artwork is one that can tell a story – maybe you chose it because you’re a big fan of the artist and wanted to have something of theirs in your home as well as support that artist, or maybe the messaging is one that resonates deeply with you and is something you wanted to be reminded of daily and share with others. Any of these would be a perfect way to add that personal touch to your decor. – Belinda Kou Choose the piece that you love When you are decorating your living space, pick a painting you love, and don’t worry if it doesn’t match the drapes or couch. The surrounding area will ‘pull’ the right colors out and complementary colors and contrast rule. – Peach McComb, Art with Attitude Incorporate quilted goods in the kitchen Add warmth to your kitchen, while handling too-hot items, with pinup oven mitts and retro potholders. Dress up your cocktail bar with embellished happy hour tea towels. – Quilting with Margaret Sometimes, the fewer the better Less is more, so that there is space for the handmade ceramics to breathe. – Liu Qian Ceramics Opt for strong color combinations for the best effect As an abstract landscape painter, I believe that simple but strong color combinations (such as complementary colors like orange and blue) create the best effect. – Beki Borman Personalize your space Placing original art in your home not only brings joy but also personalizes your space by having a one-of-a-kind piece. There’s nothing quite like the energy exchange from an original painting. From my hands to your home. – Trish Land Originally Published on Redfin.com
5 Comments
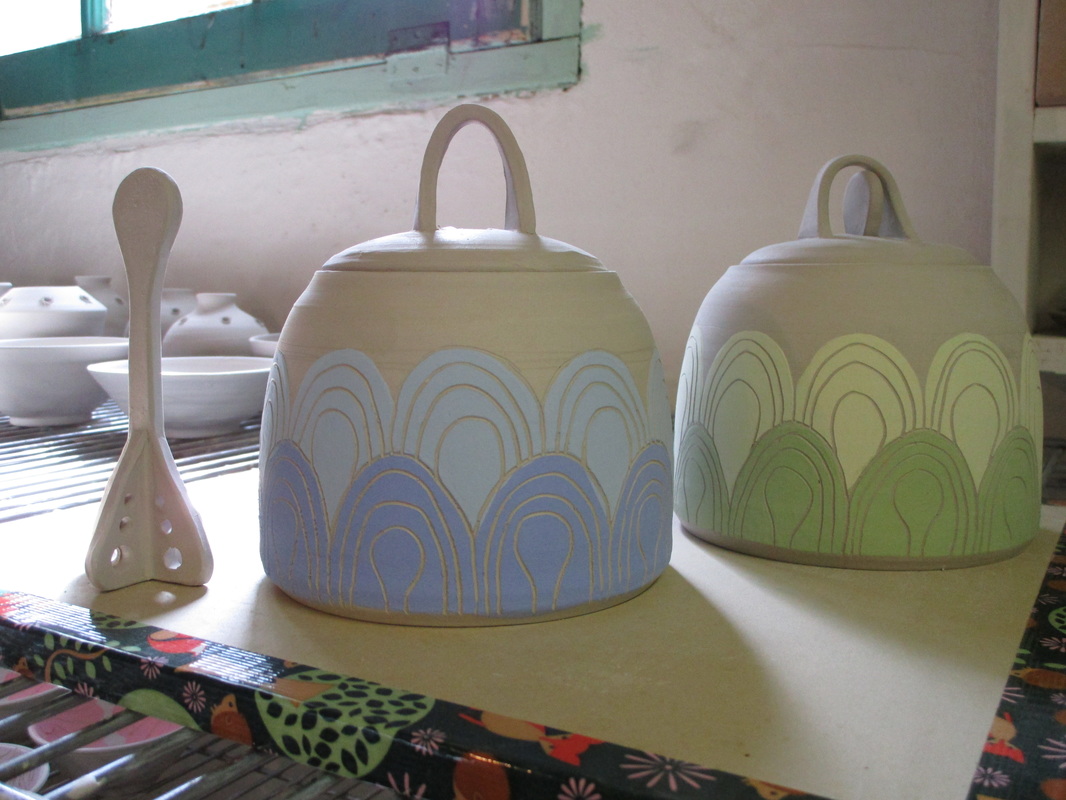 Lidded jars are one of my favorite items to work on, from sugar bowls to French butter dishes and garlic jars. I've even made a couple of urns for some beloved pets. Honey pots have been on my to do list for quite a while, but I hadn't really made time for myself to work on new shapes and imagery until recently. It was so nice to allow myself a couple of hours here and there during my studio time to just explore and experiment. I was pretty thrilled with the results of these honey pots and dippers, and so excited to open the kiln after the final glaze firing to see how they turned out. A kiln opening with new work is pretty exhilarating...that is until one of your new pieces had a stuck lid. Just for a little background info, I prefer to fire my lids with the main pot. It seems to create a better fit, less lid warping, and just fits into the kiln better. I brush wax resist on the lid and the gallery of where the lid sits. For the lidded areas that are waxed, I use a separate container of wax that has some alumina hydrate mixed in because the alumina hydrate helps the lid release after the firing. This last firing, I used a new wax resist from the Clay Art Center, called Reed's Wax. It has a smooth finish, and resists the extra glaze beautifully which made for less clean up of the pots before loading them into the kiln. I must not have added enough alumina though because when I unloaded the kiln, the blue honey pot lid was stuck on tight. I am usually pretty careful to wipe the excess glaze off between the lid and the pot but was really hoping I hadn't missed this one. Normally, I am not so attached to the pots that come out the kiln and because of the alumina trick it's pretty rare that there is a stuck lid. But I was pretty excited about these honey pots, especially the blue one. Lightly tapping the lid with a rubber mallet or wooden handle didn't work. Trying to pry off the lid with a fettling knife (which I would not recommend, BTW) didn't work. I finally Googled "stuck pottery lid" and came across a ClayArt archive with a few suggestions. So, I spritzed some water on the pot where the lid meets the main body and stuck it in the freezer, per the instructions, and waited for about 4 hours. After the pot had been in the freezer for a while, I took it out, dunked the bottom half of the pot (up to just below the rim where the lid rests) in somewhat warm water. Then tapped the lid again with the wooden handle, and the lid popped right off! I was skeptical, even though it makes sense that the thermal expansion between the hot and cold would help relieve any pressure. So, a few tricks to keep lids from sticking: Add a bit of alumina hydrate to your wax resist for lidded areas. Keep it in a separate container because if you accidentally wax the bottom of a pot with this mixture nothing bad will happen but it creates a gritty mess. I have also added a bit of food coloring to this mixture as a visual reminder that this is the alumina hydrate wax. If is is still stuck, try spritzing a bit of water between the lid and the pot, then freeze for a couple of hours. Pull out of the freezer, dunk the bottom part of pot (not the lidded part) in warm water. Lightly tap with a wooden handle. The lid should hopefully pop off. The Clayart thread suggested trying this a few times if it doesn't work the first time. Another trick that was suggested is to pour boiling water over the stuck area. I was saving that as a last resort and was happy to not have to try it. 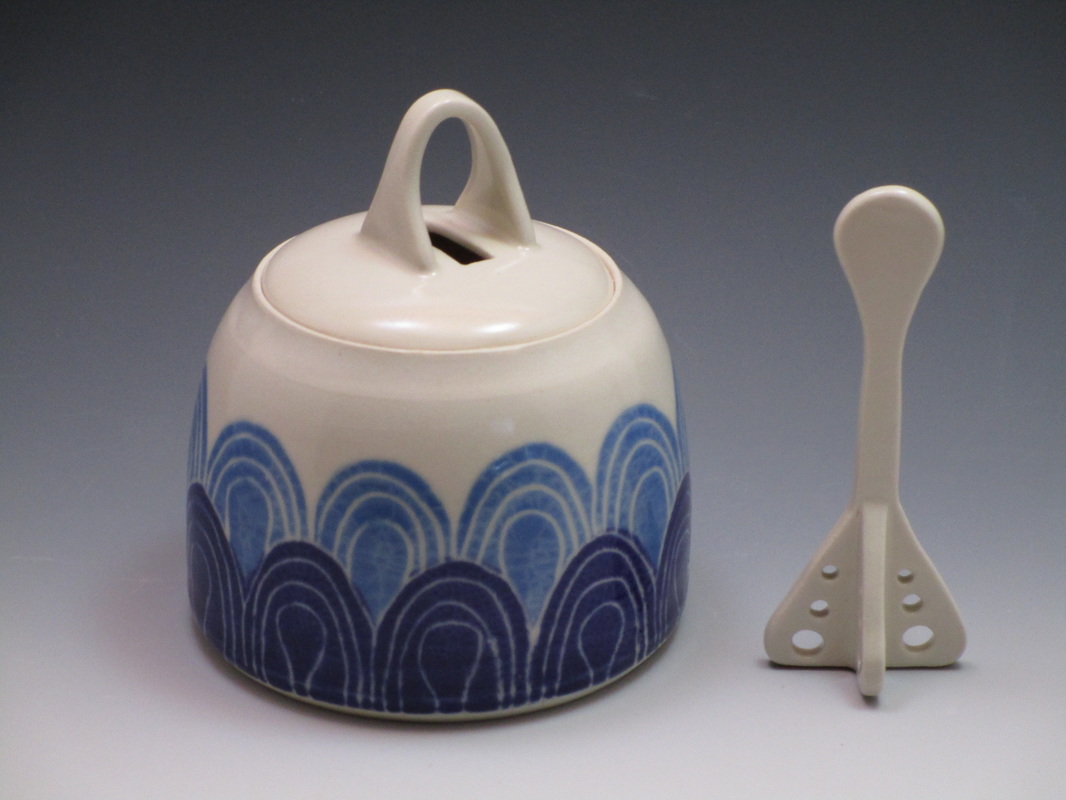 As a board member of the Washington Clay Arts Association, I have met so many people in the clay community in the last year. It has been a great way to connect with people who have a passion for clay, and get me out of the studio! We are looking for a few more people to join the fun! Spring is here; add your Ideas, Experience, & Energy to the Washington Clay Arts Association! We are seeking members to be involved with the WCA through active participation on the board or volunteer committees. Together we will shape our community. The WCA is an active, growing organization, looking for a few volunteers to help us expand our reach to ceramic artists and enthusiasts throughout the state of Washington. Most of these positions only involve a few hours a month, are a great way to strengthen your skills, and meet people who work in clay. Here are a few opportunities: Web-Master and Web Updating Committee Members Newsletter Article Writers (several would be swell) PR-Social Media Manager Exhibitions Manager Education Manager For detailed info about each position, email me at: sarahbakpottery (at) gmail.com or call Deb Schwartzkopf @ 206-653-4490 and chat about options for involvement. Many hands make light work! It is the time of year, after the craziness of the holidays, where I take a deep breath, dive in and deep clean the studio. My studio is located in our house which is mostly a blessing but can be a curse. It is in a part of the house where we store most of our excess stuff, and can also become the depository of things we don't want to deal with at the moment, especially when I am not actively making pots. December in the studio is mostly sending out orders, packing and unpacking for shows. By the end of the month, it looks as if Santa's workshop exploded in there. We spent most of last Saturday going through and purging the storage portion of the basement in a effort to get a bit more studio space which was fabulous, and funny, and emotional at times. It is amazing the things that you hold on to for much too long. There were boxes that my husband and I went through that were like opening a time capsule. I also have about 20 years of Ceramics Monthly magazines that someone is welcome to come take off of my hands. So happy that there is now a digital version. Moving on...
Yesterday was the day I had been dreading (and putting off) for longer than I care to admit. Time to clean out the clay trap under the sink. I use a Gleco Trap, but because we have low sink clearance, can only use the smallest size bottle, which holds 19 oz. Honestly, this doesn't even take very long, but is such a messy, smelly chore, and switching the bottle always seems to lead to taking apart the whole system. Mostly because I let it go too long, and it gets heavy, pulling everything out of whack. Dentists also use sink trapping systems and it may be less expensive. If you are looking for a Gleco-Trap or something similar, check out dental supply places. It brought me back to my days of being an apprentice at Eckels Pottery Shop in Bayfield, WI, and having to clean out the trap there. The used an old-fashioned grease trap, which worked great for a studio with high-volume use, and it was actually pretty easy to clean out (albeit messy, still), because it was accessible. Sink traps are a pretty important studio tool. Keeping clay out of your sewer line will save lots of headaches and $$ later on. I have been posting DIY sink trap systems for studios on my Pinterest studio and display page as I come across them, thinking maybe I would someday find one that was easier to clean out and use. Here are a few links to some in case they might be helpful for someone out there: Written by Charan Sachar of Creative with Clay: http://ceramicartsdaily.org/clay-tools/making-clay-tools/how-to-make-a-better-homemade-sink-trap-for-your-pottery-studio/ Lakeside Pottery: http://lakesidepottery.com/HTML%20Text/Tips/Preventing-clay-in-drainage.htm A good option for studios without running water from Pottery-Magic.com: http://www.pottery-magic.com/pottery/clay/sink_trap.htm LaPella Arts: http://lapellaart.blogspot.com/2007/09/potters-sink-trap.html 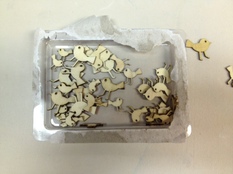 Die-cut Bird Pieces, used for creating a clay texture mat. Die-cut Bird Pieces, used for creating a clay texture mat. One technique that I have been using for a few years is to incorporate textured areas into thrown items, or into slab work (mainly buttons). I have recently started experimenting with different ways to add texture without using commercial rubber stamps, including designing and having my own custom rubber stamps produced, but that is a whole other adventure that I will share later. These laser cut wood piece caught my eye recently. Truthfully, I am a sucker for anything laser cut in general because of the precision and detail that show and had slowly amassed a collection of small laser cut wood pieces, with the idea of impressing them into clay and finally got around to doing it. 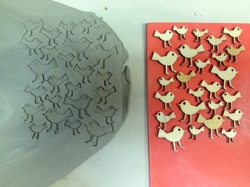 Craft foam sheets are a staple in my studio, mostly to roll our slabs, to minimize the canvas pattern from the table. I had read a tutorial about using craft foam to create textured mats on Chandra Debuse's blog here, which reminded me how useful those foam mats are. So, out came the trusty glue gun (which doesn't melt the foam, fyi) and those birds quickly turned into a nice textured mat. The beauty of this too, is that you can customize it to whatever size and shape that you need. 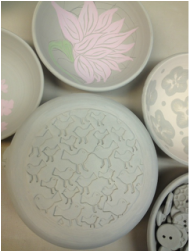 So far this mat has been used approximately 10 times and is still as sturdy as it was with the first use. The one challenge is pulling it off of the clay slowly, and as straight up (rather than at an angle) as possible. Because the die cut wood pieces are so precise, pulling it up at a angle can distort the individual impressions slightly. Here is an example of the texture on the lid of a french butter dish.
If you try making your own, I would love to see your results. Enjoy! 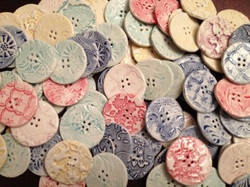 It has been a busy time of year in the studio (and at home), getting ready for holiday shows, making gifts for family and friends... I sew a bit, crochet a bit, someday hope to learn how to knit, and made my first clay button about (GASP, my does time fly!) 18 years ago. At the time I had little access to a studio or equipment, so it was a fun way to get my hands on clay. Since then, buttons have become a staple in my studio rotation. They are something I can work on while the kids are playing with clay, they fit neatly into all the nooks and crannies of the kiln that I am always looking to fill. While I haven't embellished enough of my own clothes with these buttons yet, I do have a sweet flannel bag that my grandma Esther made for me that I have added a few to for some added decoration. This bag had been laundered many times, and I am thrilled to report that the buttons go through the wash and even the dryer (on a low-medium heat setting) very well. The buttons in the photo are all destined for new homes this weekend. 200 of these lovelies have been included into swag bags for the etsyRain Homemade Holiday show that I am participating in. If you are one of the lucky 100 people each day that get a swag bag, I hope you find a great use for your button, and I would love to see photos of where they end up! More info about the swag bags can be found here (they look awesome - I really want one): http://www.handmaderain.com/ More info about the etsyRain Handmade Holidays show can be found here: http://etsyrain.com/shows/etsyrain-2012-handmade-holiday-show 
 One of the best aspects of clay is how versatile it is. You could probably spend a lifetime exploring it all the different ways to interact with it.
Printmaking has always interested me, but I was hesitant to commit to learning any processes, figuring I already had my hands full, and should focus on pottery, and all the other projects I find myself getting sucked into. So when I saw there was a weekend workshop at Pottery Northwest about printmaking and clay, I was completely intrigued. The workshop was taught by current resident, Akiko Jackson, and it was so informative. I feel like I walked away with so many possibilities to explore, and all on clay, which made me feel like I wasn't diverging too much from my intended path. Akiko demonstrated aspects of mono-prints using a plaster canvas, screen printing, lithography, and linocuts. Above is a sample of my first lithograph on a vertical surface. All of these processes were intriquing, and it was exciting to walk away with a basic understanding on how to apply them. I can't wait to start experimenting especially with screen printing on clay. If you are interested in a clay class in Seattle, Pottery Northwest is a community studio with classes for all skill levels. So looking forward to the Wedgwood Art Festival this weekend. Come on out for some great art, music food, and kids activities.
|
AuthorSarah Bak is a potter, mother, wife, trying to do it all with a bit of grace. Archives
February 2022
Categories
All
|
 RSS Feed