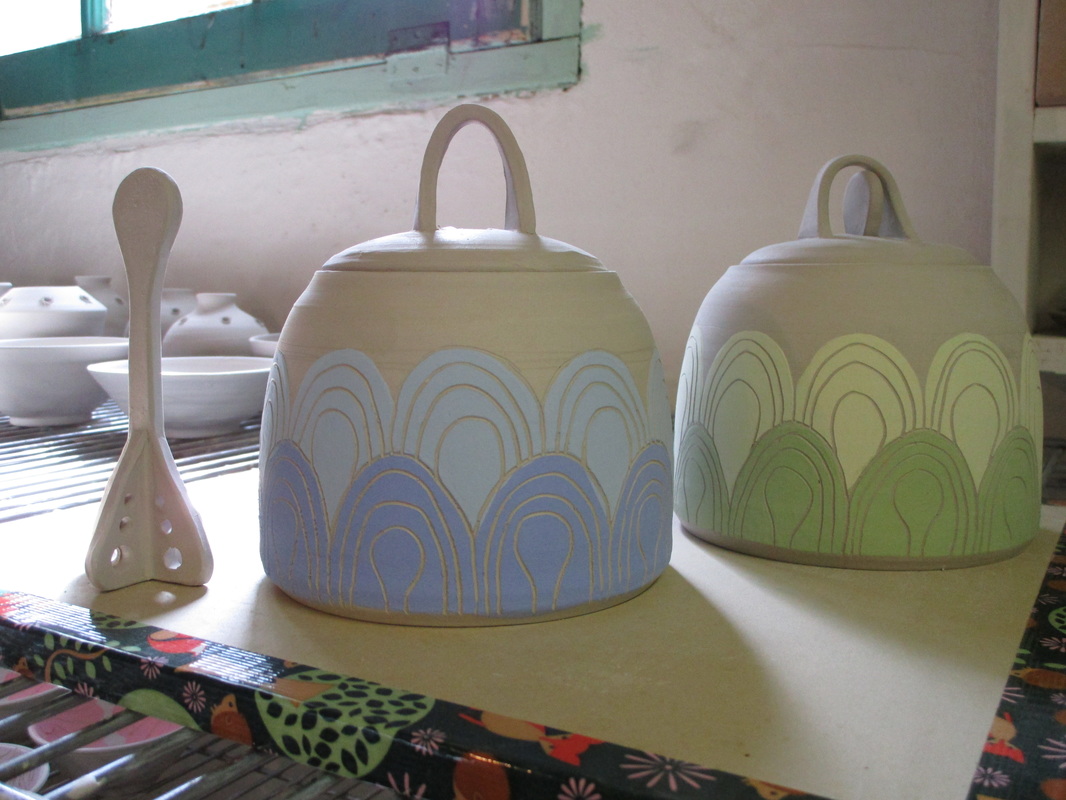
 Lidded jars are one of my favorite items to work on, from sugar bowls to French butter dishes and garlic jars. I've even made a couple of urns for some beloved pets. Honey pots have been on my to do list for quite a while, but I hadn't really made time for myself to work on new shapes and imagery until recently. It was so nice to allow myself a couple of hours here and there during my studio time to just explore and experiment. I was pretty thrilled with the results of these honey pots and dippers, and so excited to open the kiln after the final glaze firing to see how they turned out. A kiln opening with new work is pretty exhilarating...that is until one of your new pieces had a stuck lid. Just for a little background info, I prefer to fire my lids with the main pot. It seems to create a better fit, less lid warping, and just fits into the kiln better. I brush wax resist on the lid and the gallery of where the lid sits. For the lidded areas that are waxed, I use a separate container of wax that has some alumina hydrate mixed in because the alumina hydrate helps the lid release after the firing. This last firing, I used a new wax resist from the Clay Art Center, called Reed's Wax. It has a smooth finish, and resists the extra glaze beautifully which made for less clean up of the pots before loading them into the kiln. I must not have added enough alumina though because when I unloaded the kiln, the blue honey pot lid was stuck on tight. I am usually pretty careful to wipe the excess glaze off between the lid and the pot but was really hoping I hadn't missed this one. Normally, I am not so attached to the pots that come out the kiln and because of the alumina trick it's pretty rare that there is a stuck lid. But I was pretty excited about these honey pots, especially the blue one. Lightly tapping the lid with a rubber mallet or wooden handle didn't work. Trying to pry off the lid with a fettling knife (which I would not recommend, BTW) didn't work. I finally Googled "stuck pottery lid" and came across a ClayArt archive with a few suggestions. So, I spritzed some water on the pot where the lid meets the main body and stuck it in the freezer, per the instructions, and waited for about 4 hours. After the pot had been in the freezer for a while, I took it out, dunked the bottom half of the pot (up to just below the rim where the lid rests) in somewhat warm water. Then tapped the lid again with the wooden handle, and the lid popped right off! I was skeptical, even though it makes sense that the thermal expansion between the hot and cold would help relieve any pressure. So, a few tricks to keep lids from sticking: Add a bit of alumina hydrate to your wax resist for lidded areas. Keep it in a separate container because if you accidentally wax the bottom of a pot with this mixture nothing bad will happen but it creates a gritty mess. I have also added a bit of food coloring to this mixture as a visual reminder that this is the alumina hydrate wax. If is is still stuck, try spritzing a bit of water between the lid and the pot, then freeze for a couple of hours. Pull out of the freezer, dunk the bottom part of pot (not the lidded part) in warm water. Lightly tap with a wooden handle. The lid should hopefully pop off. The Clayart thread suggested trying this a few times if it doesn't work the first time. Another trick that was suggested is to pour boiling water over the stuck area. I was saving that as a last resort and was happy to not have to try it. 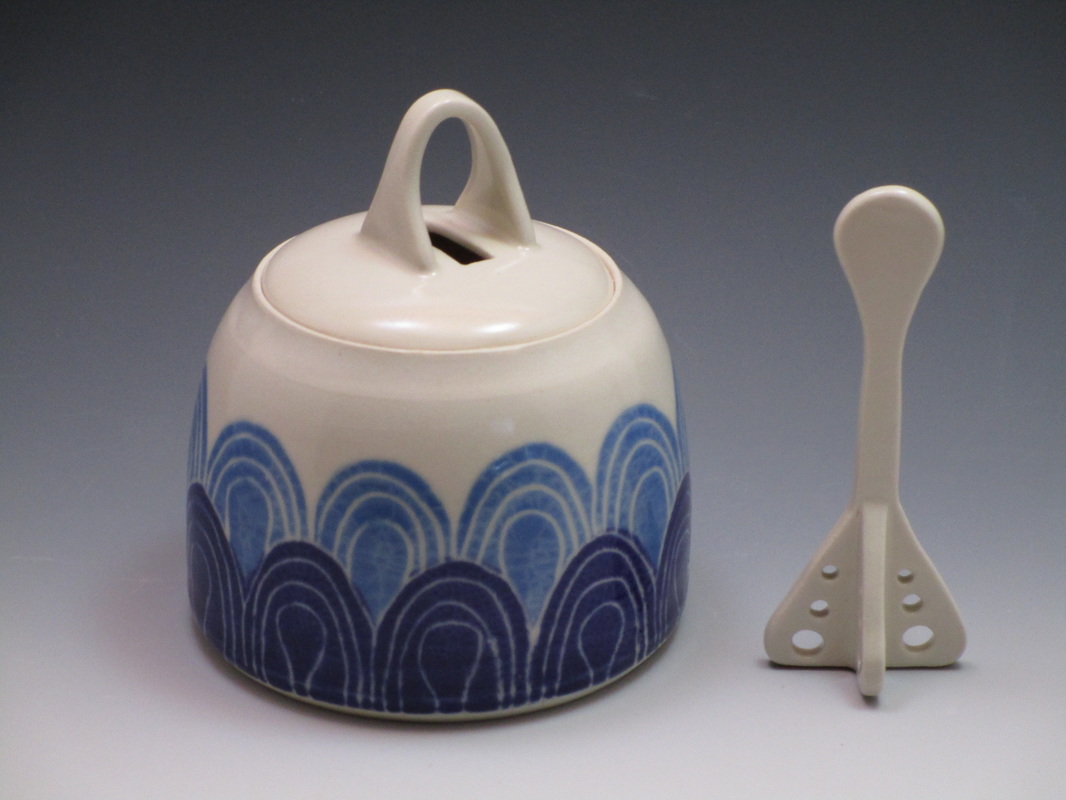
15 Comments
It is the time of year, after the craziness of the holidays, where I take a deep breath, dive in and deep clean the studio. My studio is located in our house which is mostly a blessing but can be a curse. It is in a part of the house where we store most of our excess stuff, and can also become the depository of things we don't want to deal with at the moment, especially when I am not actively making pots. December in the studio is mostly sending out orders, packing and unpacking for shows. By the end of the month, it looks as if Santa's workshop exploded in there. We spent most of last Saturday going through and purging the storage portion of the basement in a effort to get a bit more studio space which was fabulous, and funny, and emotional at times. It is amazing the things that you hold on to for much too long. There were boxes that my husband and I went through that were like opening a time capsule. I also have about 20 years of Ceramics Monthly magazines that someone is welcome to come take off of my hands. So happy that there is now a digital version. Moving on...
Yesterday was the day I had been dreading (and putting off) for longer than I care to admit. Time to clean out the clay trap under the sink. I use a Gleco Trap, but because we have low sink clearance, can only use the smallest size bottle, which holds 19 oz. Honestly, this doesn't even take very long, but is such a messy, smelly chore, and switching the bottle always seems to lead to taking apart the whole system. Mostly because I let it go too long, and it gets heavy, pulling everything out of whack. Dentists also use sink trapping systems and it may be less expensive. If you are looking for a Gleco-Trap or something similar, check out dental supply places. It brought me back to my days of being an apprentice at Eckels Pottery Shop in Bayfield, WI, and having to clean out the trap there. The used an old-fashioned grease trap, which worked great for a studio with high-volume use, and it was actually pretty easy to clean out (albeit messy, still), because it was accessible. Sink traps are a pretty important studio tool. Keeping clay out of your sewer line will save lots of headaches and $$ later on. I have been posting DIY sink trap systems for studios on my Pinterest studio and display page as I come across them, thinking maybe I would someday find one that was easier to clean out and use. Here are a few links to some in case they might be helpful for someone out there: Written by Charan Sachar of Creative with Clay: http://ceramicartsdaily.org/clay-tools/making-clay-tools/how-to-make-a-better-homemade-sink-trap-for-your-pottery-studio/ Lakeside Pottery: http://lakesidepottery.com/HTML%20Text/Tips/Preventing-clay-in-drainage.htm A good option for studios without running water from Pottery-Magic.com: http://www.pottery-magic.com/pottery/clay/sink_trap.htm LaPella Arts: http://lapellaart.blogspot.com/2007/09/potters-sink-trap.html |
AuthorSarah Bak is a potter, mother, wife, trying to do it all with a bit of grace. Archives
February 2022
Categories
All
|
 RSS Feed